kubernetes multi master node (control plane) 구성
* 주의 사항
- 신규로 추가 될 master node, worker node 는 container runtime, kubernetes 가
모두 설치 되어 있는 상황에서 클러스터 join (추가)을 해야 한다.
- 처음 kubeadm init 을 할 때 master node 의 loadbalancer ip (대표 vip) 가 있어야 한다
- 기본적으로 싱글 마스터 노드 설치법을 기본으로 숙지한 상태에서 구성 한다.(https://shonm.tistory.com/754)
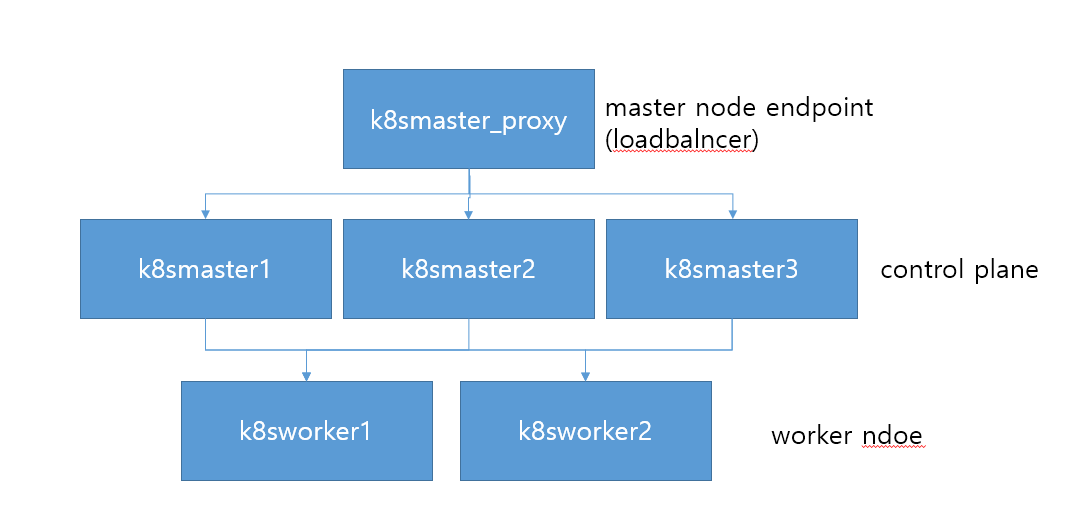
위의 그림과 같은 형태로 구성 되어야 한다.
예제 )
k8smaster_proxy : 192.168.101.156
k8smaster1 : 192.168.101.157
k8smaster2 : 192.168.101.148
k8smaster3 : 192.168.101.158
k8sworker1 : 192.168.101.153
k8sworker2 : 192.168.101.154
일반적으로 k8smaster_proxy 는 웹서버를 통해 loadbalacing 을 하는 형태로 구현 하면 된다.
가장 쉬운 형태는 k8smaster_proxy 에 haproxy 서버 구성으로 아래와 같다.
apt-get install haproxy -y

cat <<EOF >> /etc/haproxy/haproxy.cfg
frontend kubernetes-master-lb
bind 0.0.0.0:26443
option tcplog
mode tcp
default_backend kubernetes-master-nodes

backend kubernetes-master-nodes
mode tcp
balance roundrobin
option tcp-check
option tcplog
server master1 [k8smaster1의ip]:6443 check
server master2 [k8smaster2의ip]:6443 check
server master3 [k8smaster3의ip]:6443 check
EOF


#예)
cat <<EOF >> /etc/haproxy/haproxy.cfg
frontend kubernetes-master-lb
bind 0.0.0.0:26443
option tcplog
mode tcp
default_backend kubernetes-master-nodes

backend kubernetes-master-nodes
mode tcp
balance roundrobin
option tcp-check
option tcplog
server master1 192.168.101.157:6443 check
server master2 192.168.101.148:6443 check
server master3 192.168.101.158:6443 check
EOF

systemctl restart haproxy && systemctl enable haproxy
systemctl status haproxy

위와 같이 haproxy 로 master proxy 설정을 마치고,
master node 설치는 대체로 https://shonm.tistory.com/754 의 single master node 설치법을 따르면 되지만
위의 설치 중 3번(master node 설치)을 아래와 같이 한다.
IP_ADDR=`hostname -I | awk '{print $1}'` 를 실행 시키지 말고 그 이후 내용을 아래와 같이 대체 한다.
sudo kubeadm init --control-plane-endpoint "[k8smaster_proxy ip]:26443" --upload-certs --pod-network-cidr=10.0.0.0/24

# 예)

sudo kubeadm init --control-plane-endpoint=192.168.101.156:26443 --upload-certs --pod-network-cidr=10.0.0.0/24

#  --apiserver-advertise-address 옵션 대신 --control-plane-endpoint 이 들어간다.

일단 메시지 나온 대로
일단 k8smaster1 에서
mkdir -p $HOME/.kube

sudo cp -i /etc/kubernetes/admin.conf $HOME/.kube/config

sudo chown $(id -u):$(id -g) $HOME/.kube/config

echo 'export KUBECONFIG=$HOME/admin.conf' >> $HOME/.bashrc

echo 'KUBECONFIG=/etc/kubernetes/admin.conf' >> $HOME/.bashrc
이걸 실행 시켜준다
그런 다음 찬찬히 아래 내용들을 보면
상단 내용이 control plane(master node) 추가 하기 위한 스크립트
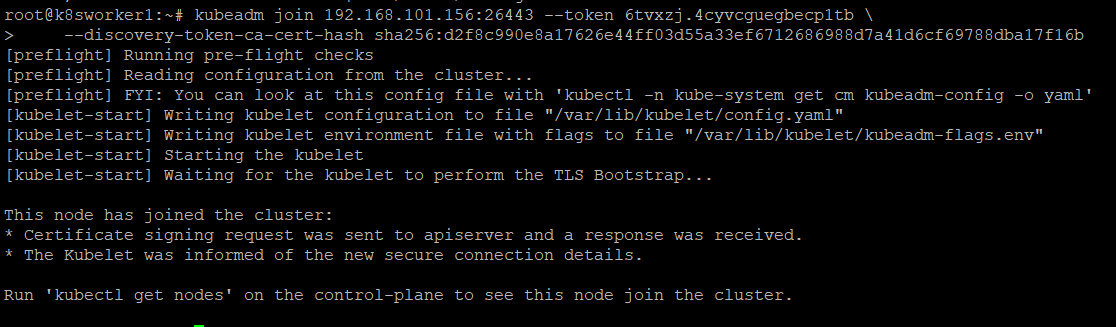
  kubeadm join 192.168.101.156:26443 --token 6tvxzj.4cyvcguegbecp1tb \
    --discovery-token-ca-cert-hash sha256:d2f8c990e8a17626e44ff03d55a33ef6712686988d7a41d6cf69788dba17f16b \
    --control-plane --certificate-key 725e5cb58750d8974b85099525cd60b14b323bd7124402dfefc89f0f6099f92d
하단 내용이 worker node 추가 하기 위한 스크립트
kubeadm join 192.168.101.156:26443 --token 6tvxzj.4cyvcguegbecp1tb \
    --discovery-token-ca-cert-hash sha256:d2f8c990e8a17626e44ff03d55a33ef6712686988d7a41d6cf69788dba17f16b
일단
Calico 를 master node 에 설치해 준다
(https://shonm.tistory.com/754 의 4.Calico 를 master node 에 설치 부분을 따라하면 된다.)
master1 에서 join 실행 한 내용

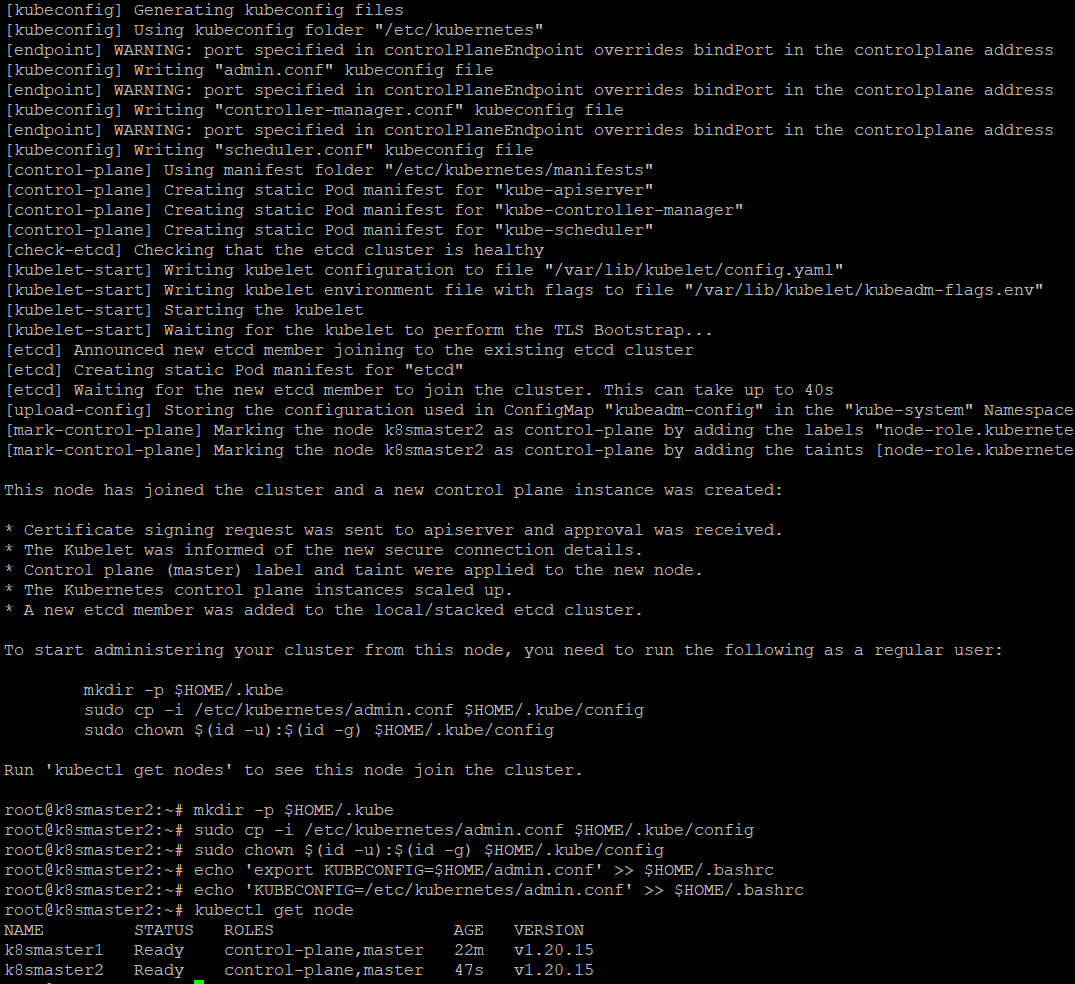
master2 에서 join 실행 한 내용
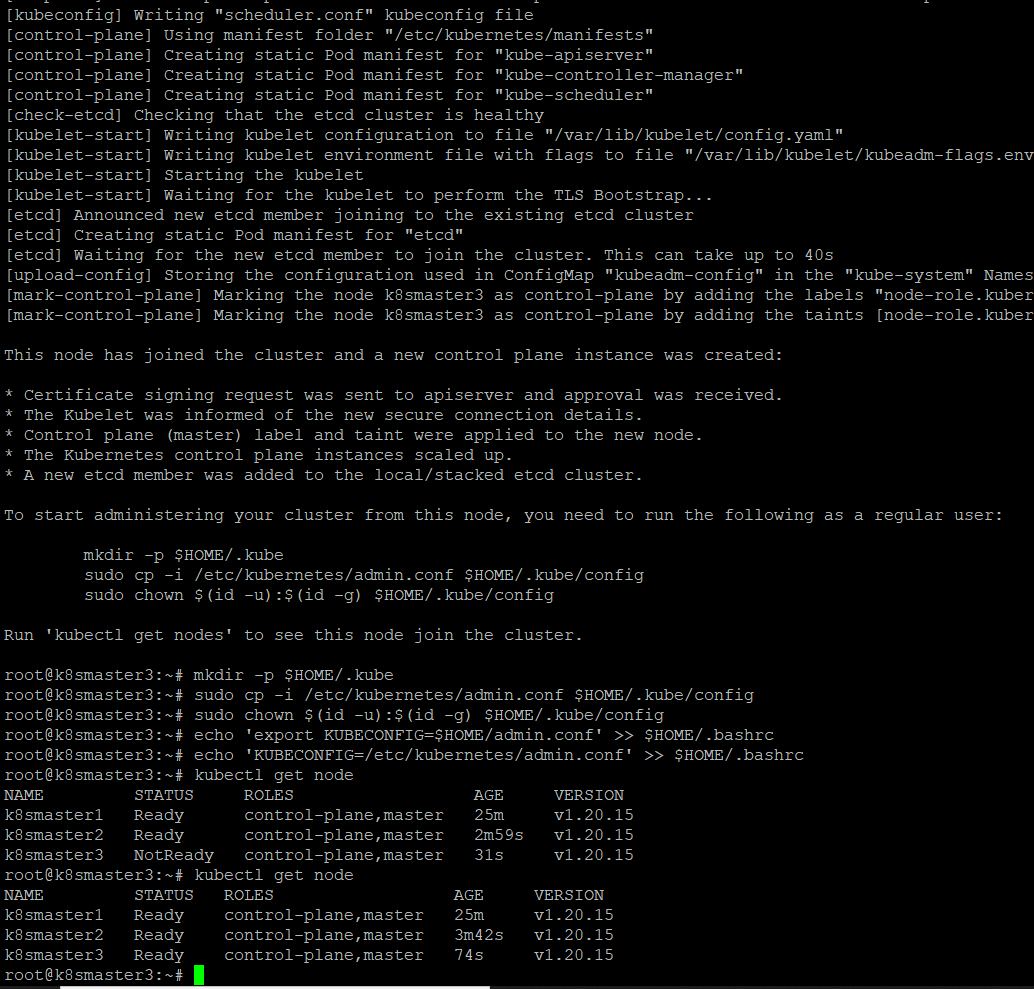
master3 에서 join 실행
k8sworker1 에서 join 실행
k8sworker2 에서도 똑같이 join 실행 하면 된다.
control plane 에서
kubectl get node 실행한 결과는
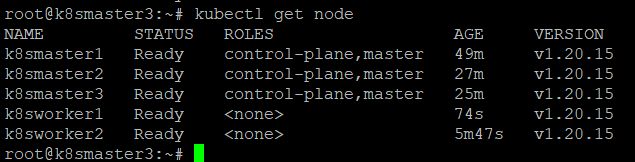
이렇게 모든 node 가 실행 되었다.